
 님
님
 내 쑥쑥트리
 쪽지
쪽지 내글
내글 스크랩
스크랩 내댓글
내댓글 북클럽
북클럽 날따방
날따방 모임터
모임터 쑥쑥몰
쑥쑥몰
 체험이벤트
체험이벤트


 로그아웃
로그아웃 PC버전
PC버전
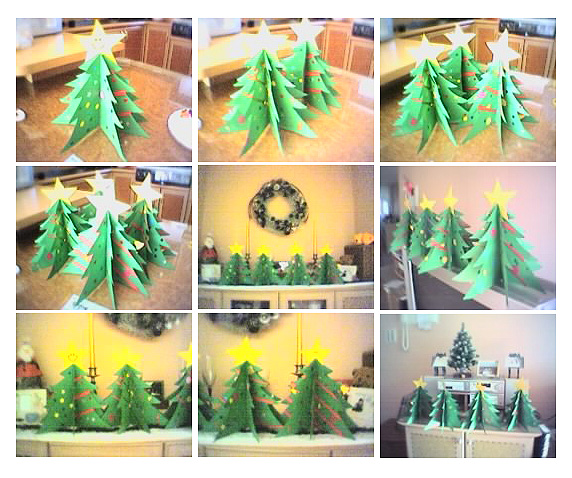
저희 영어모임에서 아이들과 함께 멋진 크리스마스 트리를 만들어 봤습니다.
지난번에 만든 산타할아버지와 함께 올려놨더니 훨씬 멋지더군요.
출저에서 올린 만드는 방법과 조금 다르게 해봤어요.
1. 네등분으로 접은 색상지에 트리모양을 그린 후 오립니다.
2. 트리에 스티커, 색상지, 크레파스 등으로 멋지게 꾸며 줍니다.
3. 스카티테입으로 서로를 연결하여 붙여 줍니다.
4. 모양에 이쁘게 잘 펴준후 꼭대기에 별을 만들어 끼워줍니다.
준비물: 초록색 색상지. 가위, 풀, 여러모양의 스티커 또는 색종이, 크레파스
자료출처: http://www.enchantedlearning.com/crafts/christmas/papertree/
1. Fold a piece of green construction paper in half, then cut it in half.
2. Put the two pieces together, and fold them in half again.
3. Draw half a Christmas tree opposite the fold.
4. Cut along the line - you should get two identical trees. Fold the trees in half, just barely creasing the center line (this is to mark the center of the tree).
5. Cut a slit along the bottom half of the center of one tree and along the top half of the center of the other tree.
6. Slip the two trees together along the slits. Using clear tape, tape the bottoms and tops together (pieces of tape on the bottom and at the top make the tree stand up well and stop the slit ends from flopping over).
7. Decorate your tree with crayons, markers, glitter glue, or tempera paint. Or you can glue on tiny construction paper decorations or use star stickers.
8. You can cut out tiny paper balls using a hole punch.
Now you have a really nice 3-dimensional Christmas decoration.





쑥쑥 플러스

강의실

쇼핑몰

공연
콘텐츠 공모전

컨텐츠
- 윤호맘
- |
- 2003-12-12 17:21
별로 어렵지 않을것 같아 보이는데도 너무 멋지네요. 저도 만들어봐야겠네요.


-
▦The Story of the Little Mole...
- purple
- |
- 2004-02-10
-

 ▦누가 내머리에 똥쌌어? 가베로..
- purple
- |
- 2004-02-12
-
지홍맘님 부탁드립니다
- 키미맘
- |
- 2004-02-10
-
가면은 여기로 가보세요...
- 지홍맘
- |
- 2004-02-10
-
흑흑..가면을 하나밖에 볼수가 없네요
- 키미맘
- |
- 2004-02-11
-
물티슈 뚜껑으로 메모리 게임
- 온맘
- |
- 2004-02-10
-
 2003년 11월~2004년 1월 수상자 발표입니다.
- 히플러
- |
- 2004-02-09
-
정말 너무 너무 고맙습니다....근데기탄이요...
- rey
- |
- 2004-02-11
-
 2003년 11월~2004년 1월 수상자 발표입니다.
- kglass
- |
- 2004-02-09
-
이렇게 자꾸 받기만 해도 되는건지.. ^^;;
- 재영엄마
- |
- 2004-02-09
-
엄마~~나 상먹었어...쑥쑥에 꾸벅^^
- 제니퍼
- |
- 2004-02-09
-
2003년 11월~2004년 1월 수상자 발표입니다.
- 유혁마더
- |
- 2004-02-09